Cross-Forest Kerberos / SPNEGO issues

Recently I was confronted with an interesting Kerberos authentication issue, so I thought why not share it for prosperity’s sake.

First a bit of background on the architecture…

We were working on migrating a fairly large customer to our Online Workspace environment. The customer had separate account domains for development, testing, acceptance and production (where acceptance and production were part of the same forest, and the other two domains were separate forests) as well as separate resource domains (all single domain forests) for DTAP. The resource forests were all hosted and maintained at KPN’s Utility Hosting, the account domains were managed by the customer itself.

We setup 1-way Incoming Forest Trusts between our AD and the 4 resource forests, but unfortunately the customer’s AD admin insisted on External Trusts to the acceptance and production domains.

When the first users were migrated to our AD and the users started testing with their applications they noticed that Single Sign-On (SSO) wasn’t working for their SAP applications. When using the sapGUI it worked fine, but connecting to the web applications resulted in a login page.

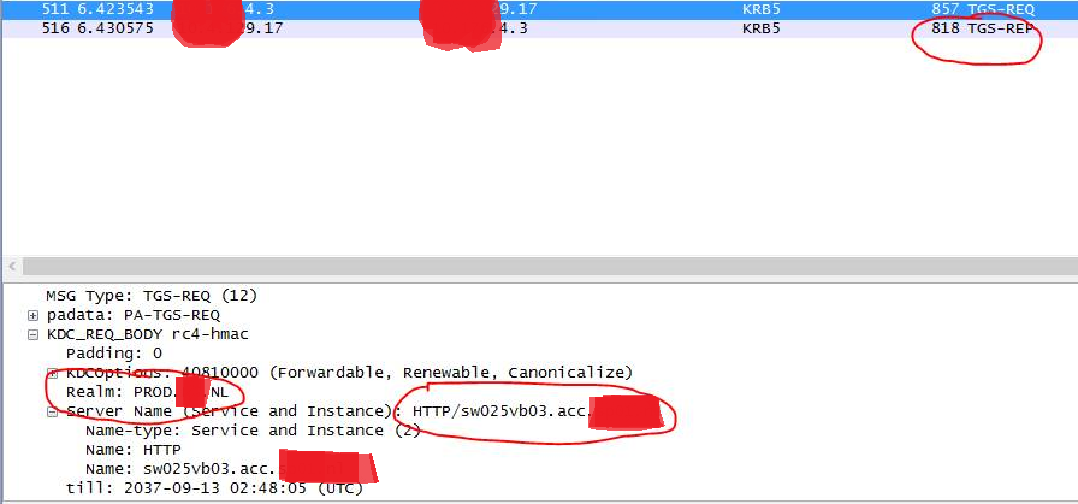
The web application was configured to use Simple Protected Negotiation (SPNEGO) for SSO. After reproducing the issue while running a Wireshark trace I noticed the client was requesting a Kerberos TGS ticket for a different ServicePrincipalName (SPN) than we put in the address bar:

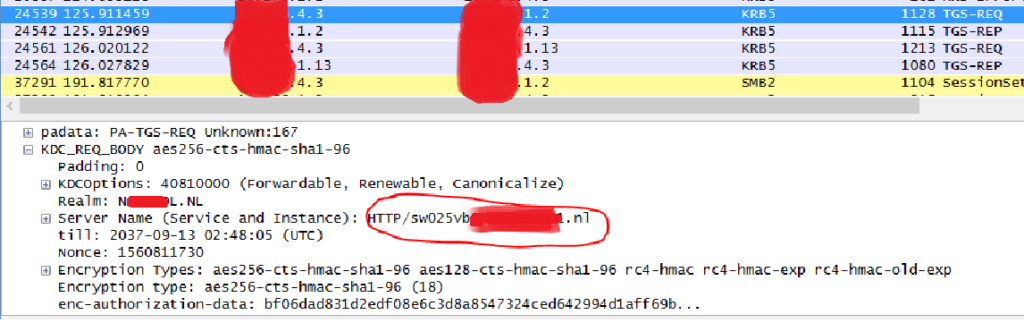
Doing a DNS lookup for the URL revealed they had configured it as a CNAME record instead of an A-record, so when the client did a DNS query for the FQDN in the url, it would request a TGS ticket for the real FQDN instead. No biggy, as long as there is a corresponding SPN configured on the account hosting the application.

As you can see in the packet trace above, the client (x.x.4.3) is contacting the local DC (x.x.1.2), receives a referral ticket and contacts the DC in the acceptance resource domain (x.y.1.13) where the server resides and gets a valid Kerberos ticket. So from a Kerberos point of view it all works fine, because we have a Forest Trust connecting to the resource domains, our local AD has the Name Suffix Routing information for these domains (stored in the Trusted Domain Object or TDO) and is able to issue the appropriate referral tickets…however SSO wasn’t working and the user was still prompted for credentials.

After talking to the SAP administrator I learned that the application was running under a service account in de production account domain. (the reason why they configured it this way was probably because in the past they had also configured the trusts between account and resource domains as External Trusts and couldn’t get Kerberos working between the account and resource domains). So the website FQDN was created in DNS as a CNAME pointing to the server in the acceptance resource domain, but it was running under a user account in the production account domain. (are you still following me?)

I first tried adding an entry in the local HOSTS file pointing the website address directly to the server IP (hence bypassing the CNAME to A-record translation), as a result the client was now trying to request a TGS ticket for the right SPN, but our KDC wasn’t able to issue a referral ticket because it had no Name Suffix routing information for the account domains because of the External Trusts not fully supporting Kerberos authentication. If you would like to know more about this, I would really recommend reading this (6 part!) article: https://jorgequestforknowledge.wordpress.com/2011/09/14/kerberos-authentication-over-an-external-trust-is-it-possible-part-6/

Packet trace with altered HOSTS file :

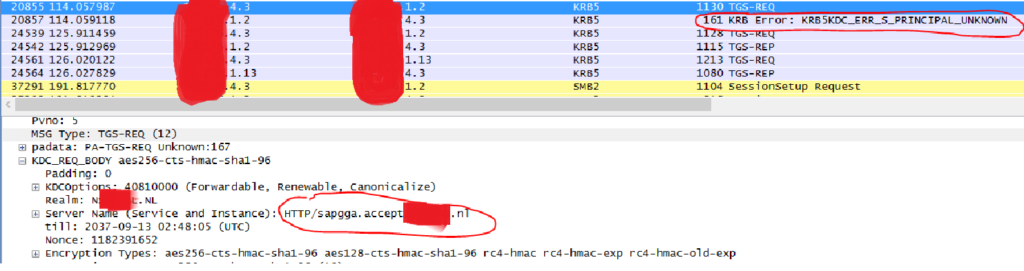
(local KDC has no routing information for the name suffix, so returns ‘PRINCIPAL_UNKNOWN’ error)

Now there is one more thing I should mention: Even if the trust had been a Forest Trust this probably wouldn’t have worked since the website address falls within the namespace of the acceptance account domain, while running as a user from the production account domain, on a server in the acceptance resource domain. (it keeps amazing me how difficult some admins make this shit)

After reading through Jorge’s blog I decided to try the Kerberos Forest Search Order (KFSO) GPO. Since I wasn’t sure how setting this GPO on the KDC would affect name suffix routing over the existing Forest Trusts, I decided to configure it on the clients instead. Unfortunately, this didn’t do jack nor shit.

So I went through the other Kerberos settings in the GPO and noticed this one: (Define host name-to-Kerberos Realm Mappings)

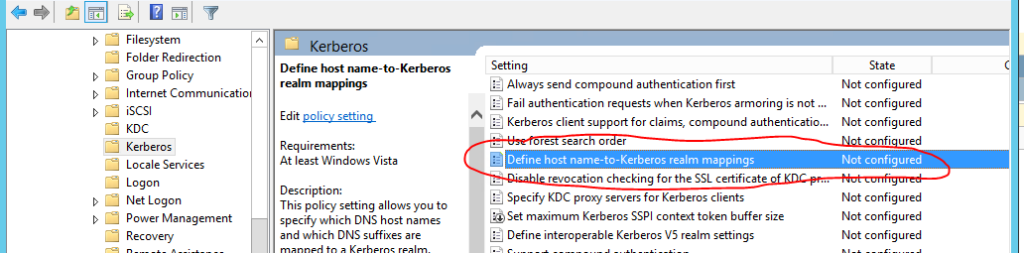
I couldn’t find much on this setting through Google, so I decided just to give it a try:

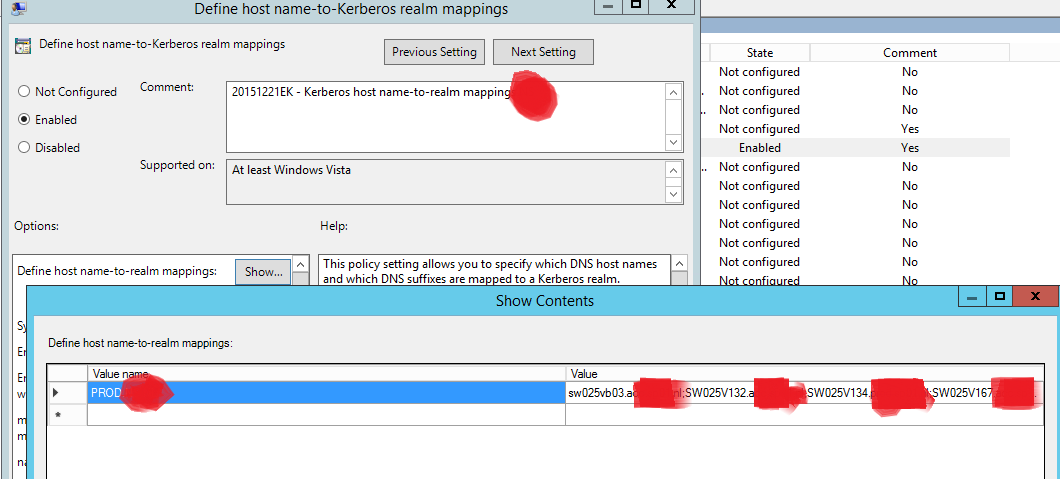
In our case we only needed to enable this for a hand full of servers so we added the list of individual servers to the specified realm, but if you need this to work for dozens of servers I would just enter the entire DNS suffix in there.

After configuring this GPO setting and doing a ‘gpupdate’ it worked! (well, at least after I removed the entry from the HOSTS file, because as it turned out they never configured the URL FQDN as a SPN, but only the server’s FQDN)

Voila, a valid Kerberos ticket:

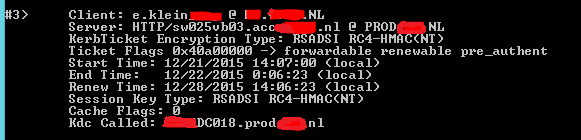
And the packet trace shows that the client is sending the TGS request straight to the correct KDC:

Lessons learned:

  • Avoid using CNAME’s when configuring Kerberos
  • Avoid using External Trusts, if at all possible, always go for a Forest Trust
  • Keep shit simple! Publishing an application running on a server in Domain A, with a service account from Domain B and using the namespace from Domain C is, imho asking for trouble!
  • Enable Kerberos logging (in Windows 2012 R2 this is no longer enabled by reg_dword LogLevel=”1″, but instead in eventvwr under ‘Applications and Services Logs \ Microsoft \ Windows \ Security-kerberos’ right-click, enable)
  • Use wireshark (portable) and the builtin Kerberos filter.
  • Before reproducing or tracing always clear your existing Kerberos tickets with ‘klist purge’ command!

Cheers,

Enrico

Shovelhead 4-speed overhaul part #2

Now that we have the primary drive components out of the way we can proceed with the removal of the inner primary housing. But before we can remove the inner housing we need to get some stuff out of the way.

First I disconnected the wires from the solenoid and got reminded that I had forgotten to disconnect and remove the battery. (dumbass!) So always start by disconnecting the battery! (I did disconnect the spark plug wires though 🙂 )

After disconnecting and removing the battery (we need it out of the way anyway to get better clearance when we need to remove the starter motor later on) I removed the solenoid from the primary housing. To get the starter gear lever and the starter shaft out, we need to unscrew the pivot bolt, that holds the the starter gear lever, from the top of the housing. This bolt can be quite tight and there is almost no room because of the oil tank….so if you hadn’t guessed by now…..time to drain the oil tank and remove it from the frame!

After draining the oil from the tank, I disconnected the oil feed and return lines, removed the nuts from the mounting studs and lifted the oil tank out of the frame. (inspect the mounting stud rubbers and order new ones if needed!)

With the oil tank out of the way I could remove the pivot bolt and take out the gear lever and starter shaft assembly.

Shovelhead solenoid plunger, starter gear lever and starter shaft assembly

The front inner mounting bolts for the primary are secured with a safety wire, after removing the steel wire, I removed the upper and lower bolt (the center bolt doesn’t go into the crankcase), then removed the 2 rear bolts and the front 2 allen head bolts on the outside of the housing. (which were metric bolts in my case, so I first had to get a set of metric allen keys :S)

But wait…I’m forgetting something…. The starter motor is still bolted to the back of the primary 🙂

After disconnecting the wires from the starter motor, (label them! Especially if all your wires are the same shade of black, like mine :S) removed the chrome bracket from the back of the starter motor on the right side of the bike. Now it was time to unscrew the 2 studs/bolts that run through the starter motor and into the starter shaft housing on the back of the primary. (carefully lift it out as a unit, make sure you don’t pull the starter motor apart!)

Now I was finally able to get the primary out of the way and get on with removal of the gearbox 🙂

Shovelhead with primary housing removed

As you can see from the picture I try to make a habit out of screwing the bolts back where they came from. This can save you a lot of trouble with the reassembly!

More to come in Part #3!

Shovelhead 4-speed overhaul part #1

Until recently my 1982 Shovelhead didn’t leak a drop of oil. One of the main issues with these bikes (in regards to marking it’s territory) is a leaking primary, but mine was sealed great with the help of James Gaskets and some blue silicon. Another source for oil leakage is the oil seal on the mainshaft of the transmission. In my case this turned out to be the cause of my Shovel marking it’s territory. It started with a small drop every now and then but it got worse rather quick.

It can be difficult to pinpoint the exact source of the leakage, because the bottom of the engine, primary and tranny is often covered in lot’s of grease and dirt. So I started by cleaning the bottom of the engine and transmission with some brakecleaner, and the next morning I could clearly see the oil trail leading from behind the transmission sprocket to the bottom mounting bolts. Time to take it apart!

Before you can get the transmission out you need to get some stuff out of the way, the most obvious being the primary drive. After I drained the oil from the primary, I removed the primary cover and ran into the first challenge: the clutch.

A few years ago I replaced my clutch with a Barnett Scorpion clutch (no more slipping!), but to get the clutch hub of the mainshaft I needed two specific tools from Barnett, a Scorpion Clutch Lock Plate and a Scorpion Clutch Hub Puller.

Barnett Clutch hub puller and lock plate

First thing was to get the clutch hub nut loose (left hand thread! so turn clockwise to loosen!). Before you can unscrew this nut you’ll need to lock both the primary and the clutch. I used a piece of steel bar and rounded both ends using a file, stuck this between the crankshaft sprocket and the clutch shell to prevent the primary from spinning. I then used the clutch locking plate to lock the inner clutch hub to the clutch outer shell. (if you have some old clutch plates lying around you could weld 2 together to make your own locking plate)

Shovelhead primary lock bar

The clutch hub nut can be very tight, so I heated it up first using a paint stripper and then, using a 1 1/8″ socket and a long steel rod over the wrench, I removed the nut. (I guess you could use an impact wrench too) Because the mainshaft is tapered, the clutch hub will be very tight, that’s why you need the puller. Be sure you screw the clutch nut back on the mainshaft for 5 or 6 turns and put a washer over the nut before you attach the puller. If you don’t, the puller center bolt will push against your clutch pushrod and you’ll brake shit. (trust me!)

Before you can remove the primary drive as a whole, you’ll need to remove the compensating sprocket from the crankshaft. This is normal right-hand thread and it takes a 1 1/2″ socket. I know some people use an impact wrench to remove the compensating sprocket, but I would personally recommend against that because there’s a risk of breaking loose the magnets on the rotor, and then you’ll have a whole new problem (especially if it goes unnoticed). Finally, loosen the primary chain tensioner and you can take out the complete primary drive.

Shovelhead with primary drive removed.

More in part #2!

1957 BSA B31 Restoration

For the last couple of months my brother and I have been working on his 1957 BSA B31 motorcycle. Approximately every Tuesday night we gather at his place to work on the bike. We started by removing the wheels to have new rims, spokes and tires fitted and are currently working on the engine. The cilinder has been bored to 400CC and we’re about to reassemble the engine. After that we still need to strip the frame and give it a new layer of paint, after that we’ll reassemble the bike and fit a new Amal MK1 Concentric carburetor to replace the Amal Monobloc.

You can watch the photo-blog here: https://goo.gl/photos/SDsVTUn5aQaWHniY9

Update: 15-may-2014

We have been working on the bike steadily for the past few months (almost every wednesday evening). The frame was recently powdercoated along with some custom fenders, engine mounting brackets and some other small parts. The cylinder was bored to approximately 400CC’s and a Honda piston was fitted too match the bore. We’ve begun reassembling the engine and tried to bolt on the cylinder head yesterday when we discovered that the firering (the protruding ring on top of the cylinder base) was higher than the depth of the corresponding groove in the cylinder head (am I still making sense?).

BSA B31 cylinder firering
BSA B31 cylinder firering, 3.2mm
Firering measures approximately 3.2mm
Groove in cylinder head measures approximately 2.3mm

So either we have the head machined or the ring on the cylinder skimmed….

Update: 22-sept-2014

Well, as it turned out, we were wrong in thinking that the fire ring on top of the cylinder barrel should stick all the way into the groove in the head. That ring and the corresponding groove actually form the mating surface. So we put a bit of coppergrease on it and reassembled the engine.

The engine is completely overhauled with new bearings and bored to 400CC’s. We also decided to invest in a more reliable oilpump made by ABSAF in Appingedam (Netherlands) and a new sump plate with magnetic drainplug by SRM Engineering.

Continue reading “1957 BSA B31 Restoration”

Verslag Workshop Distilleren en N&T Whisky Oet Grunn

Op een regenachtige 2de paasmiddag begaven mijn broer Marcel en ik ons, als vertegenwoordigers van Slijterij Frans Muthert, naar Midwolda voor een workshop distilleren bij Distilleerderij Alambik. De workshop was georganiseerd door Whisky Oet Grunn, Cafe de Toeter en Alambik.

Distilleerderij alambik met links eigenaar en distiller Zarko

Voor aanvang van de workshop was er eerst een nosing & tasting van de, nu 1 jaar oude, spirit van Whisky Oet Grunn.
De whisky bestaat uit 100% gerstemout afkomstig van de Maallust brouwerij in Veenhuizen. Dit wort is vervolgens door Zarko Nesic volgens een heel langzaam distillatie proces omgezet in circa 500 liter spirit. De spirit is vervolgens overgebracht naar een 500 liter sherry-butt, afkomstig van Highland Park, om daar minimaal 3 jaar te rijpen. Na 3 jaar wordt bepaald of de whisky goed genoeg is om te bottelen. De botteling zal op vatsterkte gebeuren.
Zoals ik al zei waren Marcel en ik onder de gelukkigen die de 1 jaar oude spirit hebben mogen proeven. In de neus kwamen meteen al hele frisse tonen naar voren, citrus, mandarijn, witte druiven, komkommer iets grassig misschien. In de mond heerlijk rond, zacht en fris, ook weer met citrus en frisse fruittonen. Een bijzonder zuiver en zacht distillaat, maar wel rijk!

Voor meer informatie over Whisky Oet Grunn kun je terecht op de website: http://www.whiskyoetgrunn.nl/.
De whisky zal ook verkrijgbaar zijn bij Slijterij Frans Muthert.

In de workshop distilleren gingen we een distillaat van bier maken, of zoals Zarko het noemt: Eau de Vie de Biere. Hiervoor gebruikten we afgedankt bier van Maallust, dit bier is niet geschikt voor verkoop omdat de flesjes bijvoorbeeld niet goed zijn afgevuld (te veel, of juist te weinig). (het bier zelf is dus niets mis mee)
De koperen ketel (inhoud 100l) werd voor ongeveer 80% gevuld met voornamelijk blond bier van Maallust en er werd een ingrediënt toegevoegd om het schuimen tegen te gaan.

De alambik wordt gevuld met bierDe ketel is gevuld, tijd om het vuur op te stoken!

Toen de ketel ongeveer 80% vol was ging de deksel erop en werd de condensor leiding gemonteerd. Tijd om het vuur op te stoken!
Bij Alambik worden de stills/ketels met houtvuren verhit, het hout wordt door Zarko met een vlijmscherpe bijl in stukken gehakt en onder de ketel in brand gestoken.

Een houtvuurtje onder de distilleerketel

Wanneer het bier een temperatuur bereikt van ongeveer 78° Celcius, stijgt de alcoholrijke damp op naar de ‘helm’ en een deel hiervan in de condensor, waar het (zoals de naam al suggereert) condenseert. De rest condenseert al in de helm en stroom terug in de ketel, dit noemen we reflux, hoe meer reflux hoe zuiverder de spirit. De spirit stroomt nu door de condensor leiding naar een koelvat. Dit vat is gevuld met water en het distillaat loopt via een spiraal door het vat waar het geleidelijk wordt gekoeld tot het onderaan het vat naar buiten stroomt.

Hier wordt de heldere spirit in een (vies) pannetje opgevangen :)

(het pannetje is wat vies, maar het ging hier dan ook meer om het demonstreren van het proces
en niet om het vervaardigen van een consumptie drank. Overigens rook en smaakte de spirit prima!)

Tijdens het distilleren van onze Eau de Vie de Biere vertelde Zarko van alles over het distillatie proces en een stukje achtergrond informatie over hem en zijn familie. Ook werden we getrakteerd op een scala aan Servische gerechten en huisgerookte worst en konden de diverse distillaten en likeuren van Alambik worden geproefd. Naast de Eau de Vie de Biere produceert Alambik o.a. een rogge jenever, een distillaat van rozijnen, een groene walnoot likeur en Rakia.

Rakia is een distillaat van gefermenteerde rozijnen, waarbij de helm van de ketel aan de binnenkant wordt bekleed met een laag honing en anijszaad. Het eindproduct heeft een mooie zachte, zuivere anijssmaak. Om te zien hoe de Rakia wordt bereid moet je zeker dit filmpje eens bekijken: http://youtu.be/Jhll1NIsGuI

Nadat de voorloop* er door was konden we het distillaat ‘nosen’ en ‘tasten’. (een zachte spirit, licht bloemig en fruitig) en werd er nog wat gediscussieerd (onder het genot van een drankje) en was er gelegenheid om de producten van Alambik te kopen.

De voorloop is het eerste deel van de distillatie en bevat een hoog percentage aan methanol, wat in grotere hoeveelheden giftig is. De reden waarom de voorloop zoveel methanol bevat is omdat methanol een lager kookpunt heeft van 65° Celcius vs 78° C bij ethanol. Overigens is het niet zo dat het uiteindelijke eindproduct vrij is van methanol, elke sterke drank bevat methanol echter slechts in kleine percentages. Het maximum percentage methanol in alcoholhoudende drank is in de wet vastgelegd.

Het resultaat van deze leerzame en leuke middag was een hoop nieuwe kennis en 2 nieuwe flessen voor in de bar!

Alambik-Walnootlikeur-en-Rakia

Voor meer informatie over Alambik kun je terecht op de website: http://www.alambik.nl/ of volg ze op twitter!

Slainte!

Whisky Festival Noord Nederland 2012

Afgelopen weekend was het weer zo ver: Het whisky Festival Noord Nederland, ofwel #WFNN in der Aa kerk in Groningen. Met ons vaste clubje whiskyliefhebbers: Erik, Marcel, Janita en ik, verzamelden we ons vrijdag om 17:20 bij de bushalte Gasselterbrug in Stadskanaal. Na allemaal een dagkaartje van 6,- te hebben gekocht (want wij dertig plussers beschikken uiteraard niet over zo’n OV-Chip geval) namen we plaats achter in de QLiner 312, waar we ons bij het 5de en nieuwste lid van ons ‘WFNN-clubje’ voegden, Johan. De stemming zat er meteen al goed in en het duurde dan ook niet lang voor de eerste schunnige opmerkingen over Marcel’s ‘tennisarm’ gesproken waren.

Iets na 18:00 uur kwamen we aan op het station, waar ons meteen al een water taxi werd aangeboden naar het Whisky Festival die we vriendelijk hebben geweigerd (voor zover ik weet ligt der Aa-kerk nl helemaal niet aan het water). Het festival begon pas om 19:00 uur, dus we hadden nog ruim tijd om eerst een bezoek te brengen aan Egyptisch restaurant Cairo in de Peperstraat, voor een heerlijke falafel schotel (met bier natuurlijk!).

Tegen 19:30 stonden we achteraan in de rij voor de ingang van der Aa-kerk,en 10 minuutjes later hadden we onze jassen afgegeven en ons wfnn Glencairn glas bemachtigd; Op naar de eerste whisky van de avond!

We begonnen allemaal met een Tomintoul 10yo, ‘The Gentle Dram’. Voor mij geen onbekende, maar een prachtig zachte Speyside om de avond mee te beginnen. Terwijl ik stond te bedenken wat mijn 2de tasting zou worden was Johan al met een Glen Garioch (16yo?) bezig, en Marcel met een Japanse Nikka 21 y.o. Janita was in gesprek met de dame van de Tomintoul dus bleven Erik en ik over met een leeg glas, en ik stelde voor om de Auchentoshan Valinch 2011 te proberen. Auchentoshan is een Lowland single malt en de Valinch is Cask Strength uitvoering van hun Classic botteling. Met 57,5% alcohol toch een verassend zachte, soepele whisky met mooie zoete vanille tonen, kruiden aroma’s en een beetje citrus.

Een paar meter verder viel mijn oog op de stand van Bresser en Timmer, de stand waar we vorig jaar een groot deel van de avond hadden doorgebracht. Mijn eerste dram bij B&T werd een Compass Box Spice Tree, omdat het woord ‘Spice’ in de naam me wel aantrok. De Spice Tree is een blend van diverse Highland Single Malt whisky‘s en gerijpt op Frans eiken. Deze blended malt doet zijn naam zeker eer aan met aroma’s van vanille, kaneel, nootmuskaat en klaver. Aangenaam zoet met een lange kruidige afdronk.

Inmiddels was ik het spoor al bijster voor wat betreft de tastings van de rest van de groep, maar volgens mij zat Marcel aan een 20 jaar oude Laphroaig van een independant bottler (the Perfect Dram misschien?). Ik schoof iets door langs de stand van Bresser en Timmer voor een Glenrothes 24 y.o. van the Daily Dram. The Daily Dram is de naam waaronder Bresser & Timmer samen met Belgische importeur ‘The Nectar’ enkele mooie bottelingen uit brengt. Deze 1984’er Glenrothes is gerijpt op een sherry vat en gebotteld op 46%, mooie fruit tonen en aroma’s van vanille en kruiden.

Vervolgens bracht onze whiskyreis ons bij de stand van Whisky-Import Nederland (WIN), van dit bedrijf had ik net een aantal mooie whisky’s zien binnenkomen bij Slijterij Frans Muthert, dus ik wilde een kijken of ik er hier eentje kon proeven. Mijn oog viel op de bottelingen van independant bottler Duncan Taylor, daarvan wilde ik de Dimensions Mortlach 1996 16yo wel eens proeven. Helaas was deze er niet bij, maar wel een Rare Auld 18y.o. uit 1993, dus ik stak gretig mijn glas naar voren. De Mortlach 18 y.o. Rare Auld is een cask strength botteling van 55,1% met sherry rijping. Het resultaat: complexe aroma’s, zoet, sherry tonen, lichte turf en vooral fruitig. Ik denk dat ik wel vaker wat van Duncan Taylor ga proeven 🙂

Duncan Taylor's Mortlach 18 y.o. 1993 Rare Auld

Alsvorens ik aan de Peat ging eerst nog wat mooie Speysides, waarvan deze me zijn bijgebleven:

  • Glenlivet Master Distiller’s Reserve – mooie zachte Glenlivet met veel hout tonen, gerijpt op een combinatie van first en refill Amerikaans en Europees eiken.
  • The Balvenie Single Barrel 15 y.o. – 15 jaar oude single cask botteling, gerijpt op ex-Bourbon vaten en in beperkte oplage van max 350 flessen gebotteld. Prachtige malt, rozijnen, noten, honing…wauw!
  • The Balvenie Peated Cask 17 y.o. – Een experiment van David Stewart, waarbij een 17 jaar oude Balvenie korte tijd werd nagerijpt op Amerikaans eiken waar voorheen zwaar geturfde whisky had gerijpt. Een geslaagd experiment, al kwam hij na de Single Barrel denk ik niet geheel tot zijn recht.

Met de Balvenie Peated Cask was meteen de aftrap gemaakt voor de meer peaty malts, op naar Ardbeg dus! (als je iets doet, dan moet je het tenslotte goed doen) Helaas had Ardbeg geen nieuwe whisky’s voor mij, maar wel een oude bekende: Uigeadail, alsmede een super vette Orange County Chopper, geheel in Ardbeg style! Terwijl Marcel en ik van onze Uigeadail en de vette Harley Davidson stonden te genieten – wat is er mooier dan met vrienden van een glas Ardbeg te genieten? Met vrienden van een Ardbeg genieten terwijl je naar een vette Harley staat te kijken! – deed Johan zijn eerste ervaring op met Ardbeg. En volgens mij heeft ie meteen het hele rijtje maar gehad, de Ten, Corryvreckan, Alligator en Uigeadail.

The Orange County Ardbeg Chopper!

Het vervolg van onze Peat-journey bracht ons terug bij de stand van Bresser en Timmer voor de machtige Buichladdich Octomore 4.1 en 4.2 Comus! Met 167PPM (parts-per-million) fenol gehalte is de Octomore tot op heden de zwaarste geturfde whisky ter wereld! Doordat deze ook nog eens cask strength wordt gebotteld op respectievelijk 62.5% en 61% (4.1 vs 4.2) is de Octomore een ware aanval op de smaakpapillen! Doordat we ons ook nog eens lieten overhalen om de whisky eerst 20 seconden in de mond te houden, daarna door te slikken en meteen diep door de mond in te ademen hebben we noodgedwongen een pauze moeten inlassen om onze smaakpapillen enigzins te herstellen.

Inmiddels had Johan ons verlaten (die moest wat eerder naar huis), en kwamen wij tot de conclusie dat we nog maar de helft van de kerk hadden gehad, en de avond bijna om was! Het was tijd voor een bezoekje aan het Diageo plein voor 2 hele bijzondere whisky’s, de Port Dundas 20 Years Old Single Grain Whisky gevolgd door de Port Ellen 11th Release, 32 Years Old. Gedistilleerd in 1978 in een distillery waar tegenwoordig alleen nog maar gerst wordt gemout, en in 2011 gebotteld op een vatsterkte van 53,9%. Een mooie rijpe en complexe malt met tonen van fruit, granen, iets citrus en lichte rook en maritieme aroma’s. Marcel en ik hadden beide geen spijt van deze tasting van 15,- euro per glas!

De avond zat erop, en een galmende stem sprak door de kerk (god?) dat we zo langzamerhand maar eens richting de uitgang moesten. Maar niet zonder een laatste dram van onze eigen Nederlandse master distillers Zuidam, te weten een 100% Pure Pot Still Dutch Rye whisky (oftewel, geen Gerstenat, maar Roggenat!)

Tot volgend jaar in der Aa-kerk in Grunn!

Enrico Klein